- Activate geolocation
- Prepare a document for workflow
- Create a workflow
- Add signer in the workflow creation process
- Choose the signature flow type
- Choose the remote signature method
- Choose a contact for the signature
- Complete missing contact information
- Required contact information format
- Verified contact displayed for selection
- Proceed to next step after selecting a verified contact
- Confirm signature placement and proceed
- Finalizing signature assignment
- Send document
- Advanced ID verification (signer view)
- Step 1: Identification via ClaveÚnica
- Login with ClaveÚnica
- Step 2: Enter Chilean national ID card number
- Step 3: Answer personal questions
- Step 4: Create security PIN
- Verification complete
- Signing with PIN (future signatures)
- Start the signature
- Download and verify the signed document
- Verify details of the Remote Advanced Signature
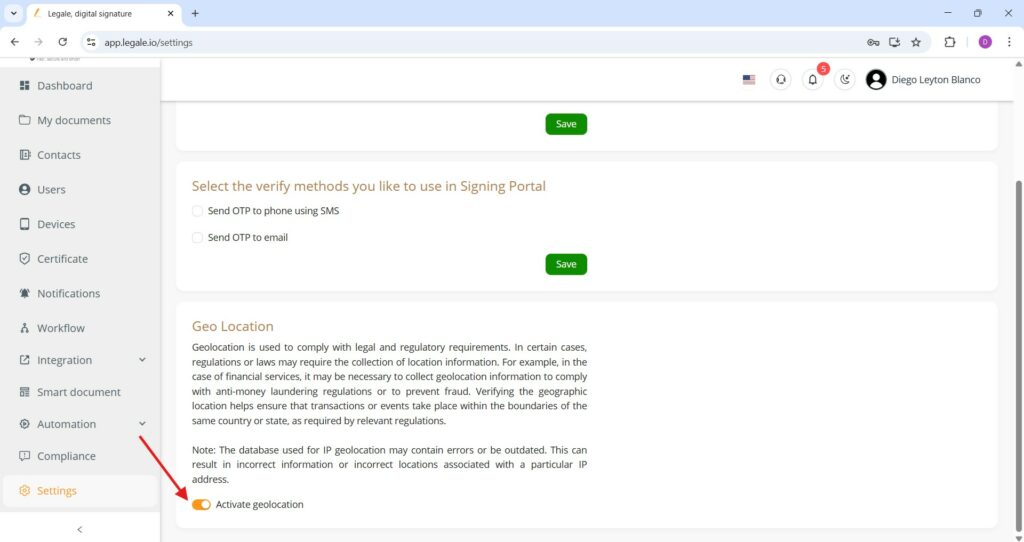
Activate geolocation #
To ensure compliance with legal and regulatory requirements, geolocation can be enabled under the Settings tab by toggling the “Activate geolocation”.
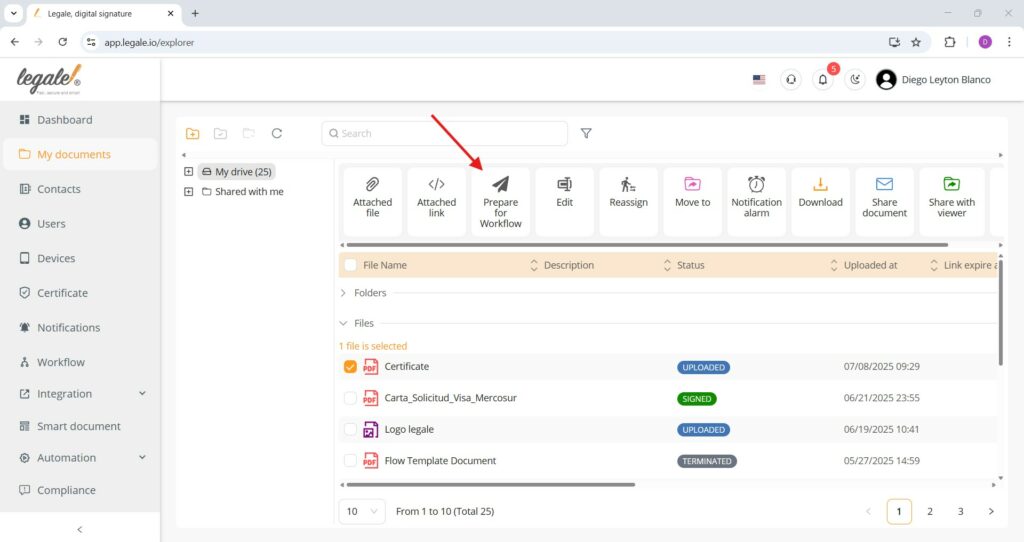
Prepare a document for workflow #
To initiate a workflow using a selected document, go to the My documents section, select the desired file from your drive, and click the “Prepare for Workflow” button located in the top menu.
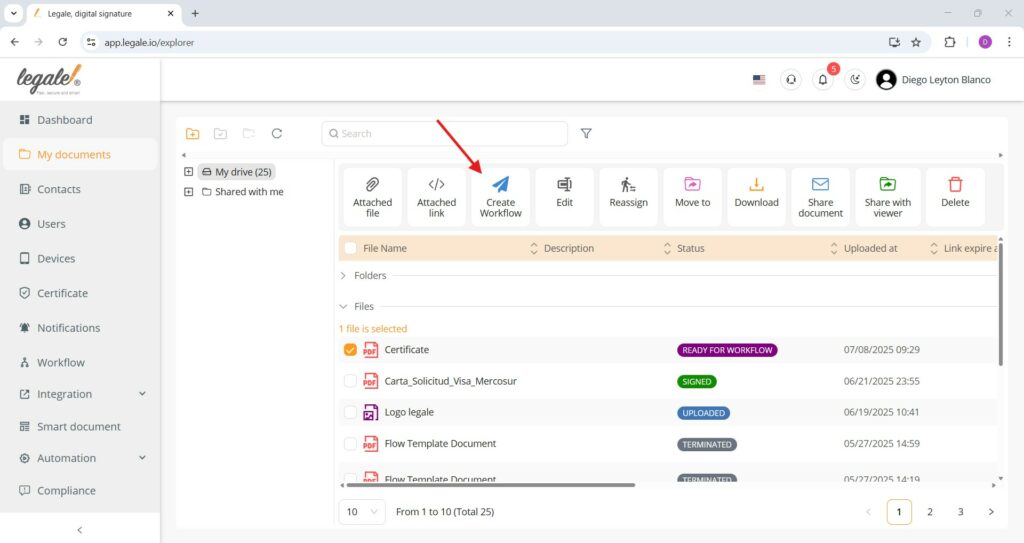
Create a workflow #
Once a document’s status is set to “READY FOR WORKFLOW,” you can initiate the process by selecting the file and clicking the “Create Workflow” button from the top menu.
Add signer in the workflow creation process #
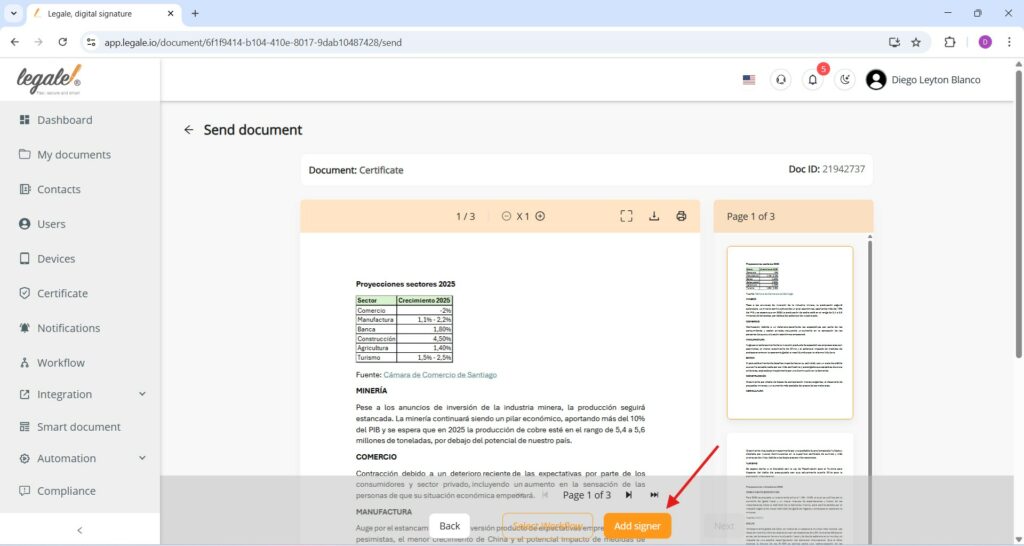
During the workflow setup after selecting a document, you must click the “Add signer” button at the bottom of the screen to designate participants who will interact with the document.
Choose the signature flow type #
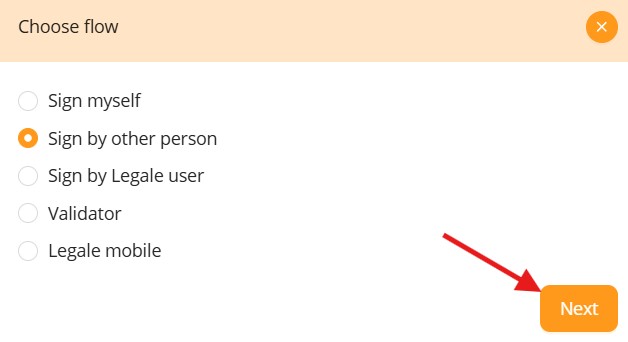
When setting up the workflow, you must select a signature flow that matches your needs—“Sign by other person”—and then click the “Next” button to proceed with assigning the signer.
Choose the remote signature method #
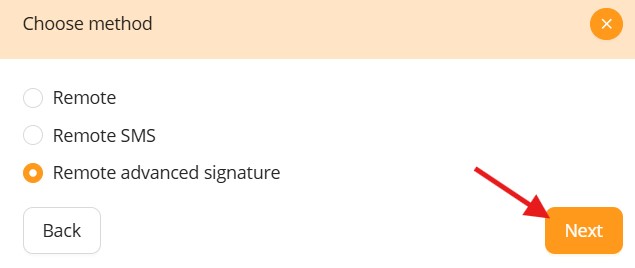
To continue setting up the workflow for a signer, select “Remote advanced signature”—this is a manual method that requires identity verification via advanced authentication steps—then click “Next” to proceed with configuring the signer’s role in the process.
Choose a contact for the signature #
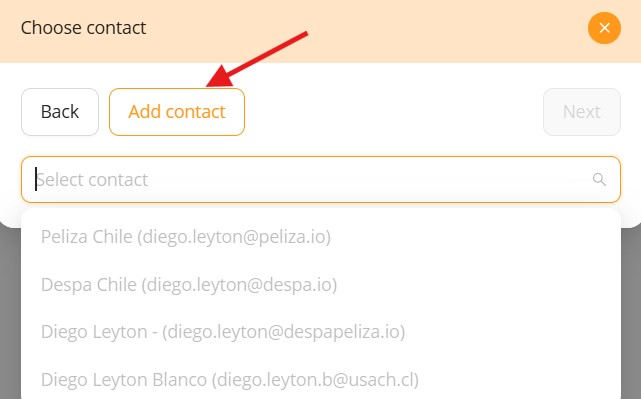
In this step, the contact list is shown for selection. However, you won’t be able to select contacts that do not have complete required information (such as missing identity details). To proceed, click “Add contact” and manually input the full information needed for the remote advanced signature process.
Complete missing contact information #
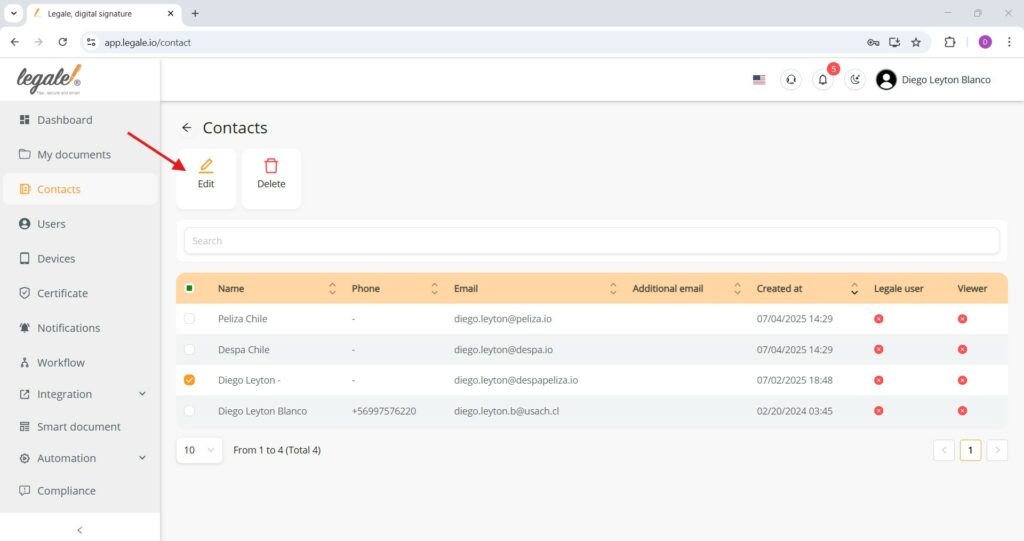
If a contact cannot be selected during the signature process due to incomplete information, you can edit an existing contact by selecting it and clicking the “Edit” button.
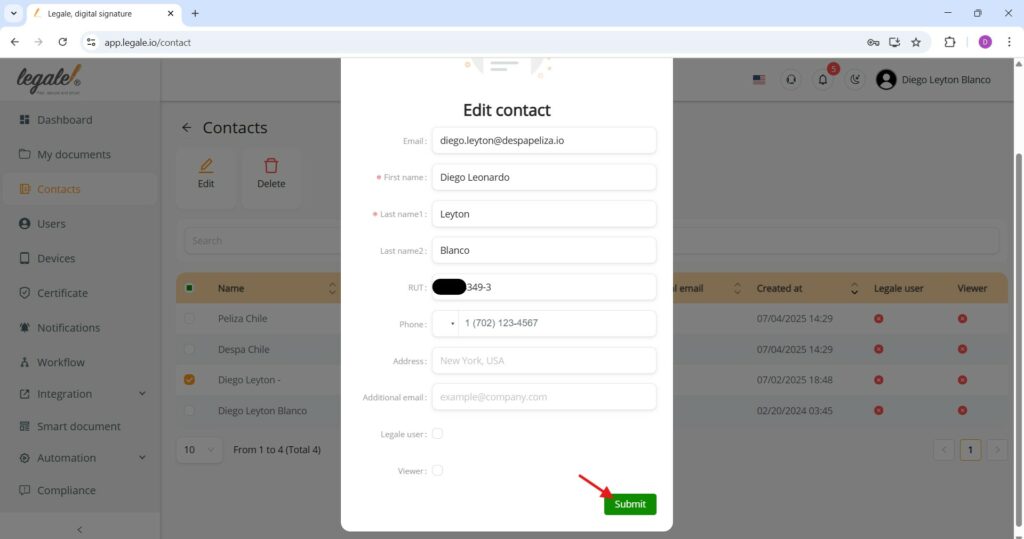
Required contact information format #
When editing or completing a contact for Remote Advanced Signature, make sure to enter the full legal name exactly as it appears on the official ID, and include the RUT without periods but with a dash (e.g., 12345678-9). This ensures identity verification works correctly during the signing process.
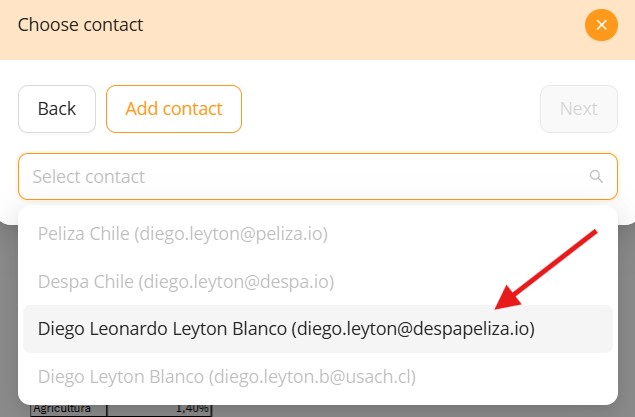
Verified contact displayed for selection #
Once the contact has all mandatory data (full name and RUT), it becomes selectable in the “Choose contact” list when assigning a Remote Advanced Signature signer.
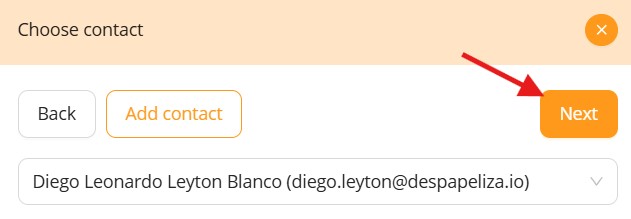
Proceed to next step after selecting a verified contact #
After selecting the contact with all required personal details completed, click the Next button to continue.
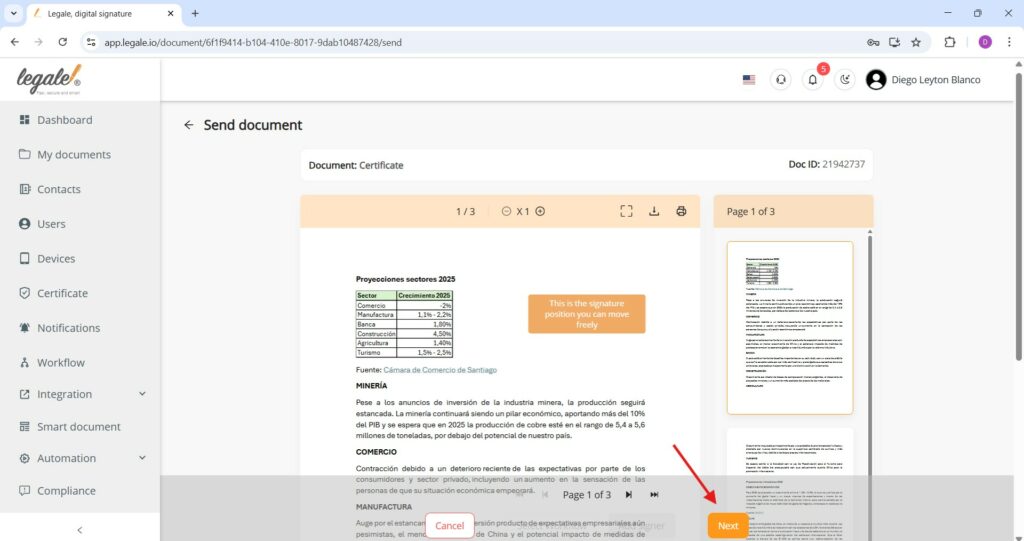
Confirm signature placement and proceed #
After positioning the signature field in the desired location on the document, click Next to finalize the setup.
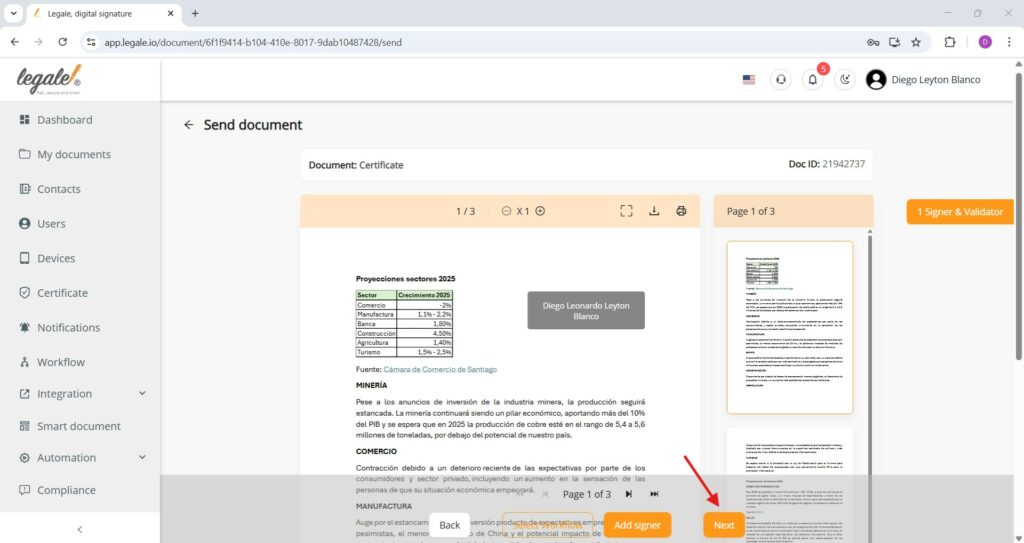
Finalizing signature assignment #
Once the signature placeholder is correctly positioned and the signer has been assigned, click Next to proceed to the final step of sending the document.
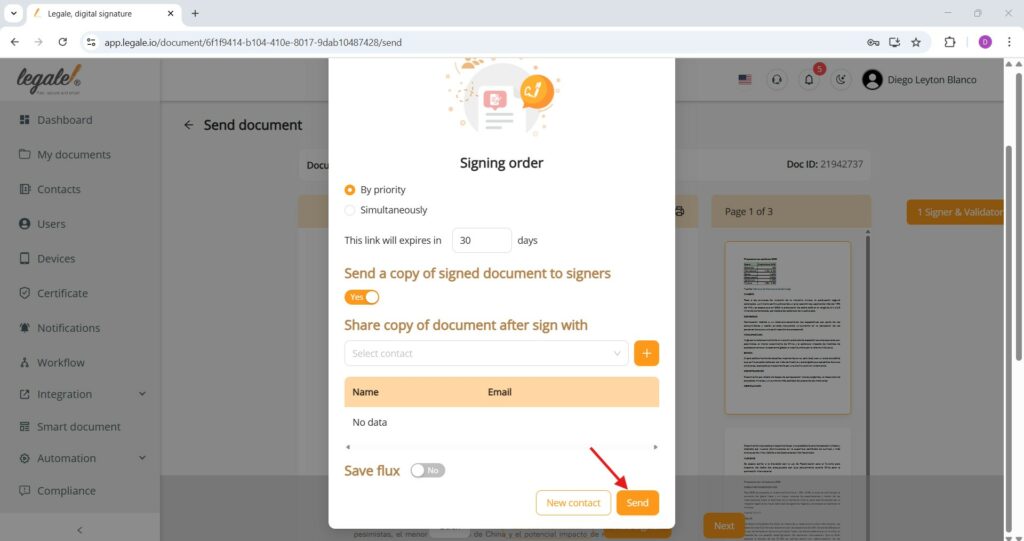
Send document #
In the final window, you can configure the signing order, set the link expiration period (in days), and decide whether to send a signed copy to signers. You can also choose to share the document with additional contacts after signature and optionally save the flow for reuse. Once everything is set, click Send to dispatch the document.
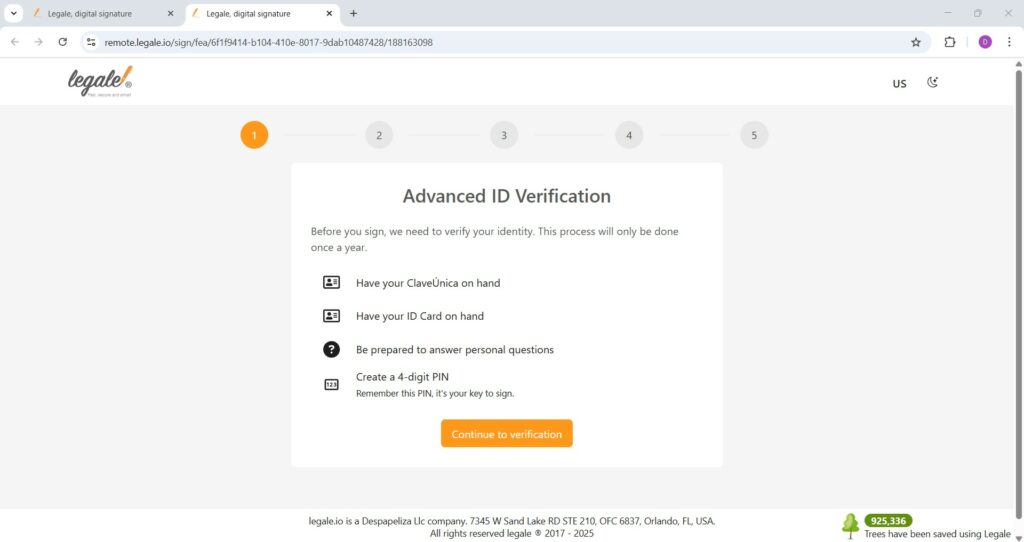
Advanced ID verification (signer view) #
When the recipient receives the document for a Remote Advanced Signature, they must go through an identity verification process before signing. This process includes:
-
Having their ClaveÚnica and ID card ready
-
Answering personal identity questions
-
Creating a 4-digit PIN, which will be used to access and sign documents in the future
This verification step is required only once per year and is essential to ensure secure and legally valid digital signatures. The signer must click “Continue to verification” to begin the process.
Step 1: Identification via ClaveÚnica #
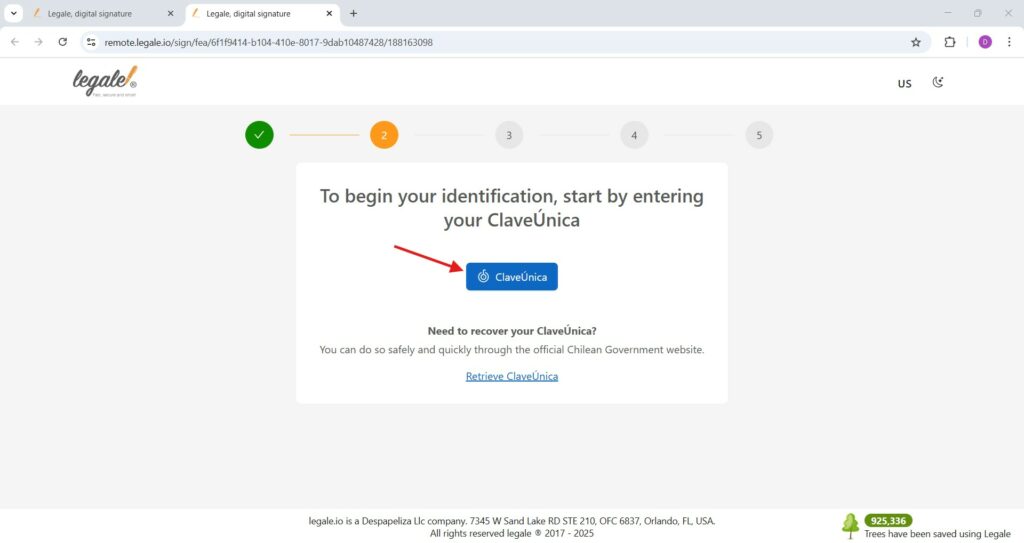
To start the Advanced ID Verification, the signer must click the ClaveÚnica button and log in using their Chilean government credentials. If the signer doesn’t remember their ClaveÚnica credentials, a recovery link is provided directly on the screen to retrieve them safely through the official government website.
Login with ClaveÚnica #
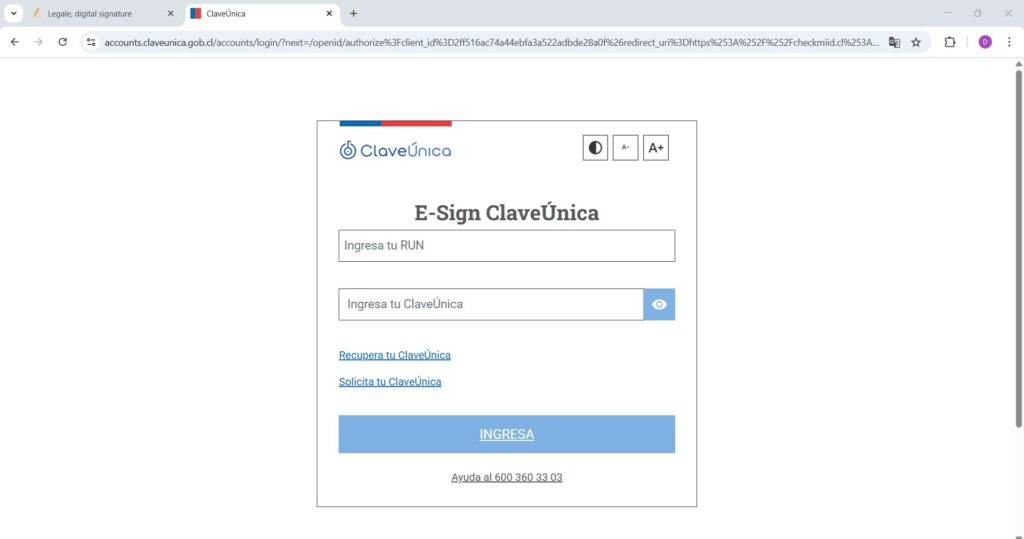
On the ClaveÚnica login screen, the signer must enter their RUN (Chilean National ID number) and their ClaveÚnica password, then click INGRESA to proceed. If the signer does not remember or does not yet have a ClaveÚnica, they can click on the links “Recupera tu ClaveÚnica” or “Solicita tu ClaveÚnica” to recover or request it through official Chilean government channels.
Step 2: Enter Chilean national ID card number #
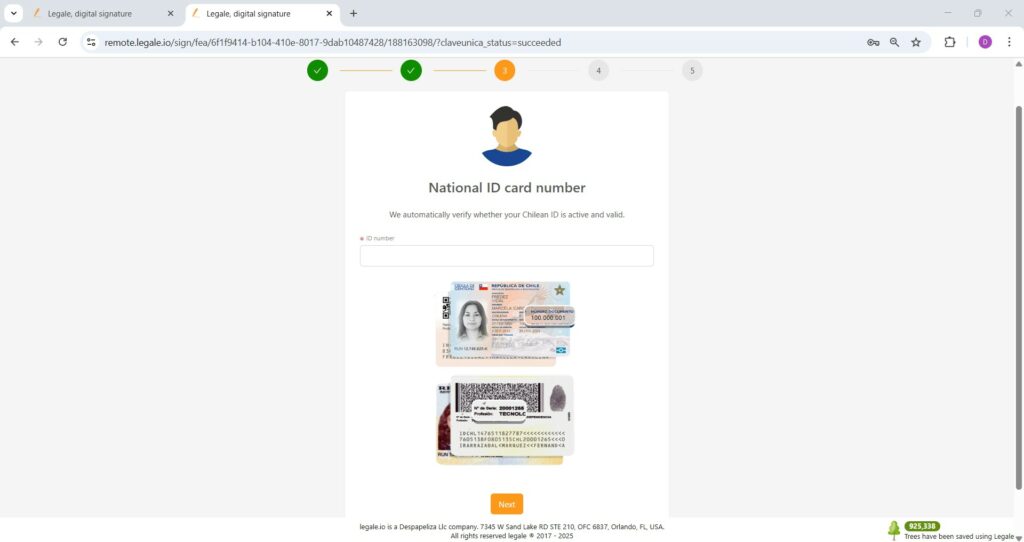
After logging in with ClaveÚnica, the signer must enter the document number from their Chilean National ID (Carnet). This number is located on the front of the ID and is required to verify that the ID is valid and active in the national civil registry. Once entered, click Next to proceed.
Step 3: Answer personal questions #
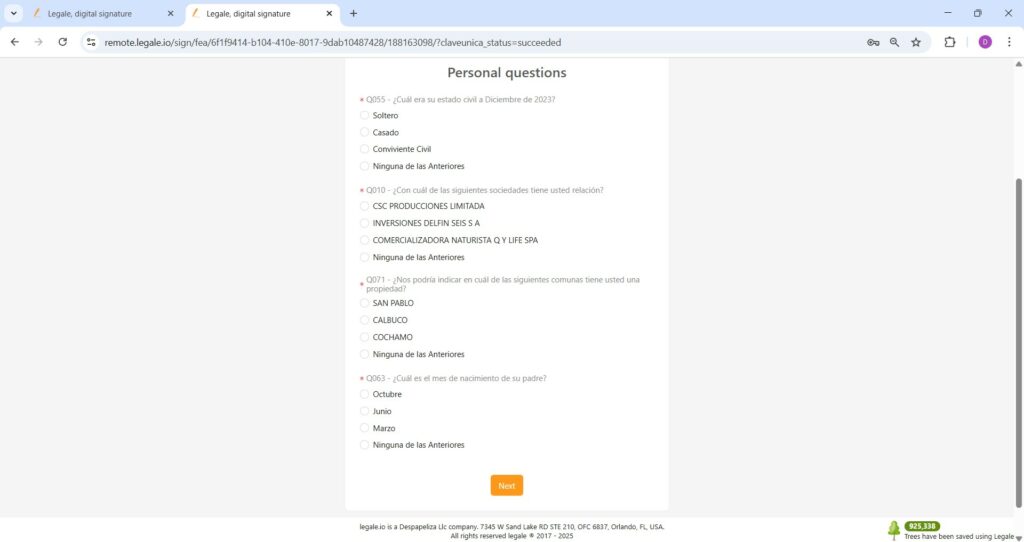
To ensure identity verification, the signer must answer a set of personal questions generated from official records. These may include civil status, business affiliations, places of residence, or family information. After selecting the correct answers, click Next to continue.
Step 4: Create security PIN #
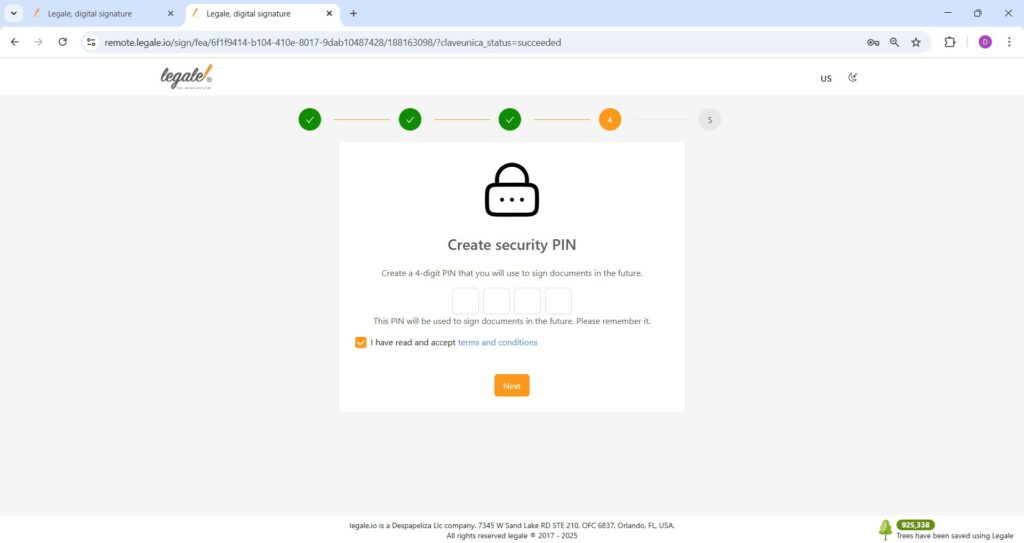
In this final verification step, the signer must create a 4-digit security PIN that will be used to sign future documents with the advanced remote signature method. This PIN must be kept secure and remembered, as it is essential for validating all subsequent signatures. The signer must also check the box to accept the terms and conditions before clicking Next.
Verification complete #
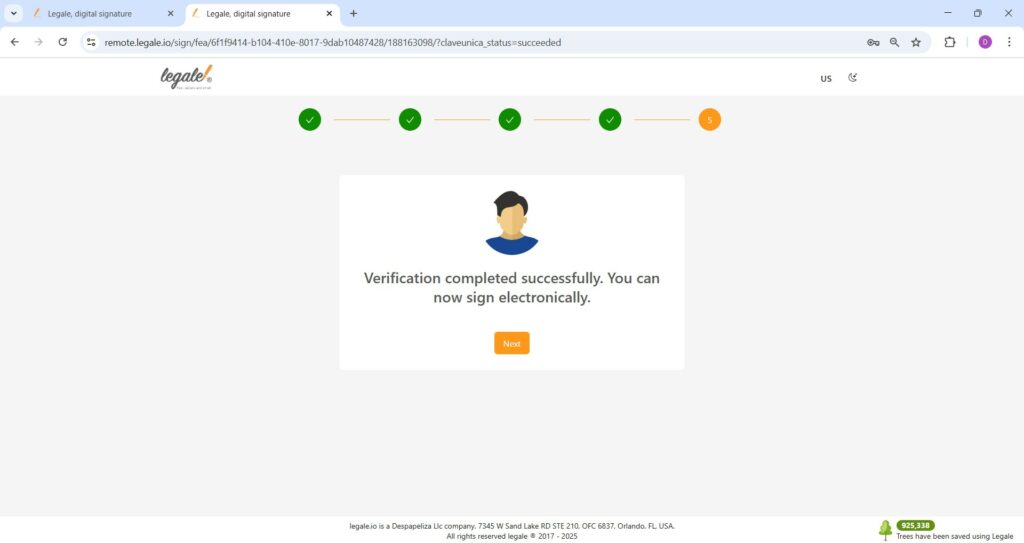
Once all identity checks have been passed, the signer reaches this confirmation screen. It indicates that verification has been successfully completed and the user is now eligible to sign documents electronically using the Remote Advanced Signature method. Press Next to proceed with the actual signing.
Signing with PIN (future signatures) #
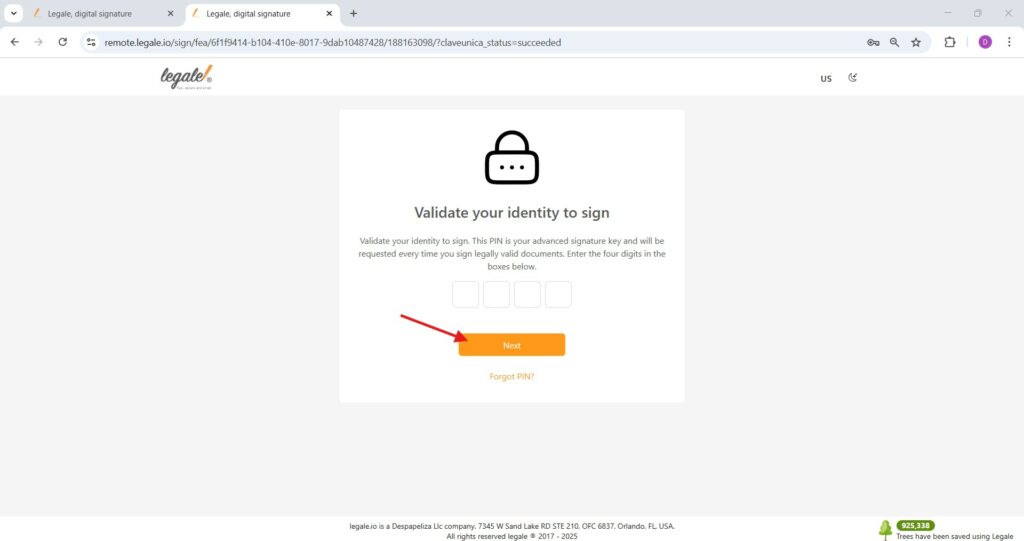
After completing the full verification process for the first time, all future signatures using the Remote Advanced Signature method will only require entering the 4-digit PIN you previously created.
Start the signature #
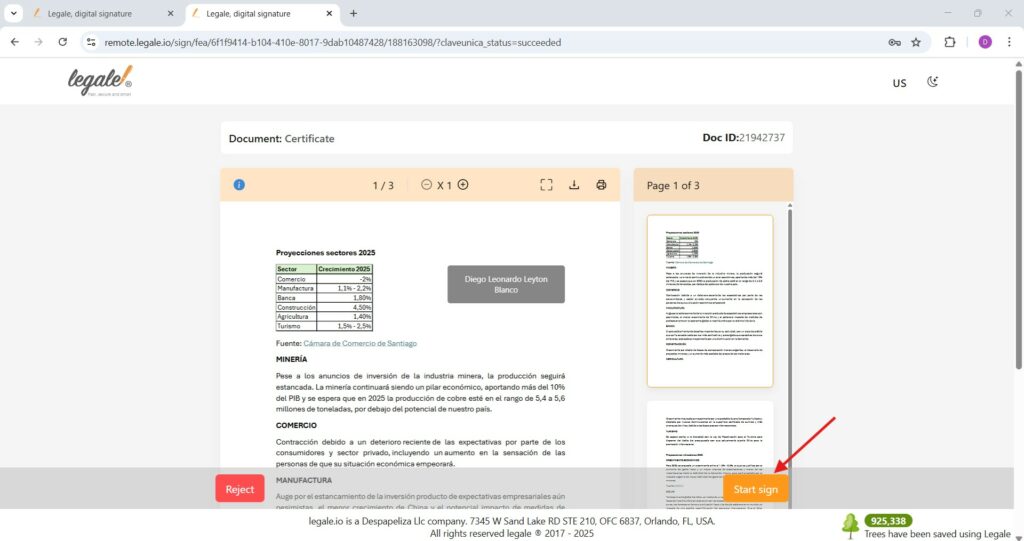
Once your identity is validated, you will see the document preview along with your name already placed in the signature field.
To proceed, click the “Start sign” button at the bottom right corner.
Download and verify the signed document #
Once the Remote Advanced Signature is complete, download the signed document from Legale.io after the signing process concludes. Open the file using any PDF editor.
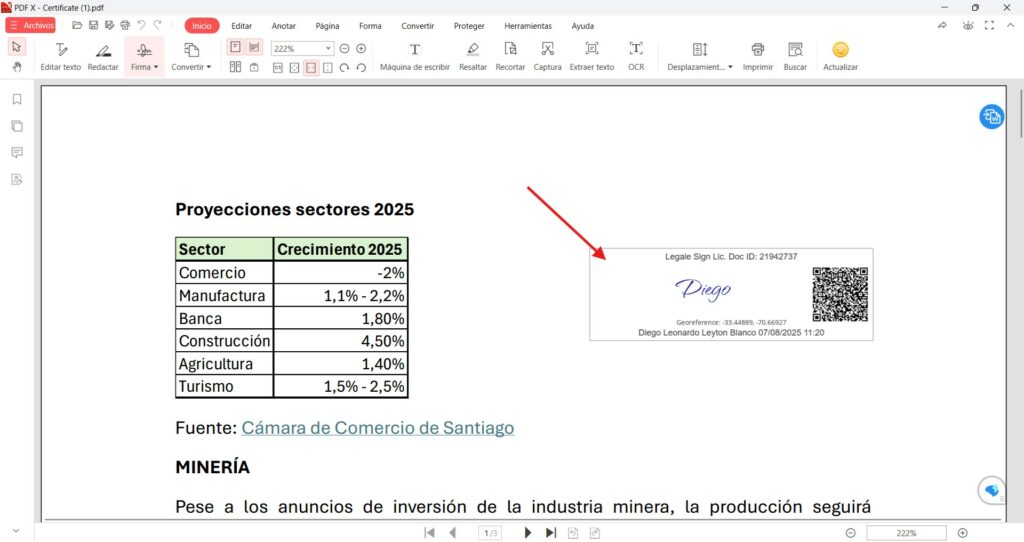
You will now see the signature block clearly embedded in the document. It includes: signer’s full name, timestamp, signature image, document ID, geolocation and QR code.
Verify details of the Remote Advanced Signature #
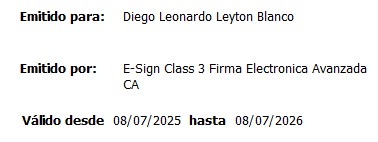
To ensure the document is validly signed and compliant, open the signed PDF and view the certificate details. You’ll find the following information:
-
Emitido para:
Diego Leonardo Leyton Blanco
This confirms the identity of the signer. -
Emitido por:
E-Sign Class 3 Firma Electronica Avanzada CA
This is the Certificate Authority (CA) that issued the digital certificate for advanced electronic signature. -
Válido desde / hasta:
-
Start:
08/07/2025 -
End:
08/07/2026
This indicates the validity period of the digital certificate associated with the remote advanced signature.
-
