Take a Photo #
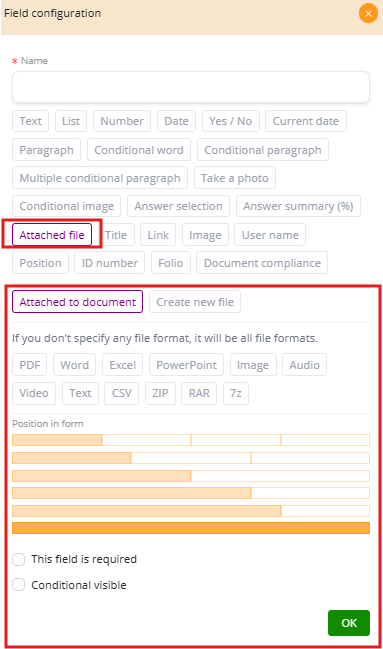
The Take a Photo Field allows the user to capture or upload a photo directly when filling out the form. It is typically used with a device’s camera (mobile or computer), or by uploading an existing image file.
Configuration Options #
-
Width / Height (cm): You can specify how the photo will appear in the final document by setting its dimensions.
-
If left empty, the photo is inserted at its original size.
-
If values are set, the image will be resized accordingly.
-
Use Cases #
-
Identity Verification: Capture a photo of a user or their ID card as part of the signing process.
-
Inspections: Document the state of an asset (e.g., equipment, property, or vehicle) at the time of evaluation.
-
Proof of Delivery: Take a photo when delivering goods to confirm their condition upon receipt.
Example #
-
Field: Take a photo of your ID card.
-
User opens the form on a smartphone → camera opens → picture is taken → inserted in the final PDF contract.
-
-
Field: Upload or capture a photo of the delivered package.
-
Width set to 8 cm, Height set to 6 cm → image is resized automatically in the document.
-
Conditional Image #
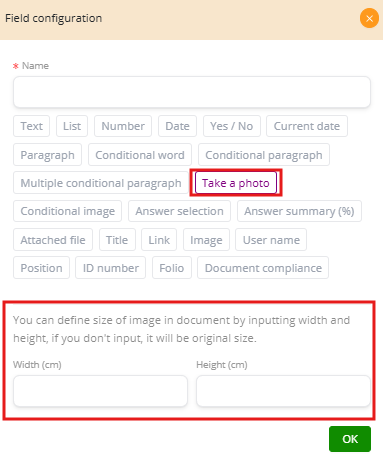
The Conditional Image Field allows an image to be displayed only when a specific condition is met. This is similar to conditional words or paragraphs, but instead of text, an image is shown dynamically.
How It Works #
-
Select the field to evaluate: Choose a form field such as Branch, Country, Payment Method, Gender.
-
Define conditions: Use operators (=eq, !=neq, >gt, <lt, contains, etc.) and assign the value that triggers the image.
-
Attach the image: Link the condition to the image you want to display.
-
Form layout: Use the yellow bars in Position in form to define the image size in the document layout.
Examples #
-
Branch logo:
-
Field: Branch
-
Condition: If Branch = “New York” → Show New York logo.
-
If Branch = “London” → Show London logo.
-
-
Payment method:
-
Field: Payment Method
-
Condition: If Payment Method = “Credit Card” → Show a credit card icon.
-
If Payment Method = “Bank Transfer” → Show a bank icon.
-
-
Gender-based title:
-
Field: Gender
-
Condition: If Gender = “Male” → Show “Mr.” image/icon.
-
If Gender = “Female” → Show “Ms.” image/icon.
-
Options #
-
This field is required: Forces at least one condition to be satisfied; otherwise, the form won’t be valid.
-
Conditional visible: The image placeholder itself appears only if another rule is met.
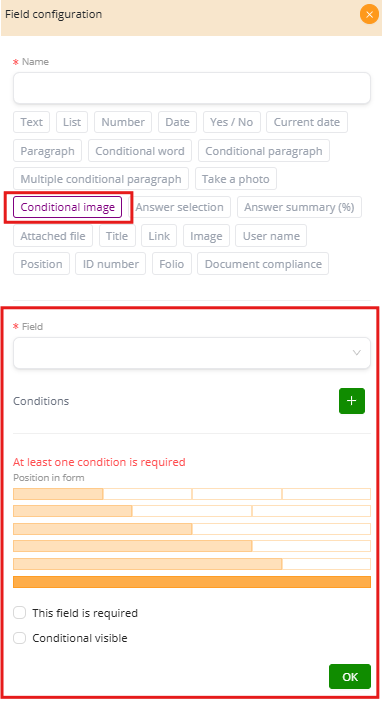
Image #
The Image Field is the simplest way to insert a fixed image into a document. Unlike the Conditional Image field, this option always displays the same image, regardless of user input.
Configuration #
-
Select image: Upload or choose the image file you want to insert.
-
The image will automatically appear in every generated document where this field is included.
Typical Uses #
-
Company logo: Place your corporate branding consistently across all documents.
-
Watermark: Add a background image or a transparency that identifies the document as official.
-
Standard graphics: Include seals, icons, or banners that must appear in all versions of the document.
Example #
-
Upload company_logo.png → The logo is inserted at the top of every generated contract.
-
Upload official_stamp.jpg → A fixed stamp is included on all invoices.
Attached File #
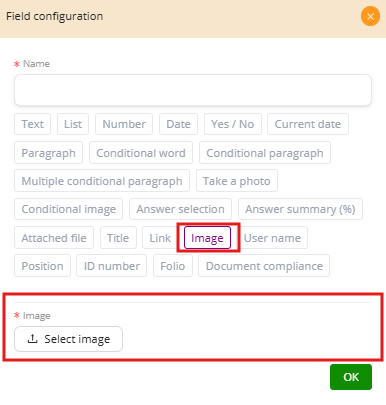
The Attached File Field allows users to upload external files and link them directly to the Smart Document. This ensures that all supporting documents are kept together in one workflow.
Configuration Options #
-
Attach to document / Create new file
-
Attached to document: The file is stored as part of the main document.
-
Create new file: The uploaded file becomes an independent file in the system.
-
-
Allowed formats
-
You can restrict file types to formats such as PDF, Word, Excel, PowerPoint, Image, Audio, Video, Text, CSV, ZIP, RAR, 7z.
-
If no format is selected, the field accepts all file types.
-
-
Position in form
-
The yellow bars define the width of the field in the form layout.
-
Example: place the file upload field full width (100%) or share the row with another field.
-
-
Additional options
-
This field is required: The form cannot be submitted unless a file is uploaded.
-
Conditional visible: The field only appears when a specific condition is satisfied.
-
Examples of Use #
-
Contracts: Attach annexes such as ID scans, certificates, or additional terms.
-
Compliance: Require users to upload a tax form (PDF) before completing the process.
-
Technical workflows: Collect evidence like Excel data sheets, images, or inspection reports.